Remote control your Linux Workstation (Efficiently)

There are many different solutions to remote control your Linux workstation but most of them are not effective. For example, one can always ssh into the workstation and forward X. Well, this kind of works but has several drawbacks; the major one being that all the processes you started with your ssh session will be killed when you loose your SSH session. I call nohup, screen, etc. as bypass methods because they essentially try to give you a workaround solution instead of actually solving it. And if you are like me who keeps logging in and out and starting/stopping scripts, I am pretty sure you will forget to use those just like me and login after a good night sleep to find out that your compile script got terminated because you forgot to screen it! Also, SSH with X forwarding typically needs an X-Server on your host machine and can be a PIA to setup if you are on Windows. Yes, yes, we can all use MobaXTerm but hey, believe me, X-server is heavy in terms of resource usage on Windows. Also automatic file changes are not detected with that solution.

Next in the queue of nonviable solution is x2go. I haven’t been able to use it properly because the X-server on my windows machine keeps crashing whenever I have a different resolution than the one on the workstation. So that is a big failure. Then minors on the list are VNC, RDP, XRDP, etc. All have their drawbacks. For VNC, it is excruciatingly slow when I use it. Also the ability to dynamically change screen resolutions is tossed out of the window. Yes, I know about the geometry setups in .vncstartup but hey, I am in no mood to write down all the resolutions that I want to use in that file! It is NOT EFFICIENT. RDP and XRDP rarely if ever works and again is affected by the slowness.

So the last remaining option is to use NX from NoMachine. Both the NXServer and the NXClient are actually free for personal use. One needs to install the server on Linux (pretty simple with the deb file provided). And then use the NXClient on windows and it works like a charm. Of course again, the whole thing becomes mighty slow under the following conditions:
– Changing the resolution of the remote display to a different one than the monitor connected to
– Using a virtual display instead of the actual physical one

Now, there are multiple reasons to use virtual displays with the simplest being that I can turn off my monitor and still use NX. And the person sitting on the desk besides my Linux workstation does not see a ghost operating it. And yes, there is an option to turn off physical display when someone connects, but as soon as you logoff, the physical screen becomes active in its full form. And if you forget to lock the computer before disconnecting your NX client, the person besides you gets access to your screen and can start doing weird stuff on it. Believe me, I have a monkey friend who used to do that and one time, he simply shutdown the machine to annoy me and get me to commute the whole 25KM (he wanted to have lunch with me!). Besides that, as I wrote earlier, I want to keep changing the resolutions as I work. When I am editing stuff, I need lower resolution bigger fonts, when it is compiling/running scripts, I can go with the default 2K resolution.

Virtual displays are a great way to do this. So now you want to evaluate the terminal server from NX but don’t. Use the LTSP (Linux Terminal Server Project) which works amazingly well with the NX protocol. Just

sudo apt-get install ltsp-server-standalone

and you are off to go. Now you will have a virtual desktop that you can connect to (in fact as many as you want) without having to cough up the precious greens or settling for something low grade. You can always ssh and have NX running simultaneously. Best part with NX is that you can pickup from where you left off. Yes, now that is what I call efficient.

ENJOY your remoting Linux workstation from Windows and still being happy!
Tensorflow mnist_deep.py OOM error when running on GPU!

I know you are interested in #MachineLearning and your first instinct is to use #TensorFlow (of course since it is backed by #Google) and you will probably find a lot of support with queries. The best part is that the available #Docker container will help you experiment and it simply runs out of the box. Look at my article on getting started with Tensorflow. Soon you will get bored by the amazingly slow executing speeds on CPU and will be thirsty to run it on your GPU because:

1. GPU is faster at running multiple parallel threads
2. GPU is faster at doing matrix/multi-dimensional operations
3. Your GPU is simply idling when you are running model training/inference on your CPU
4. Your coffee can only last for 2 minutes in which GPU can finish processing your model whereas, with CPU you will need at least 10 coffees (not good for health)
5. Last and not the least, go and get yourself an NVIDIA GPU if you haven’t already to save yourself time and achieve efficiency

In any case, all experts & hobbyists alike train their models on GPUs. And boy they have powerful GPUs (Quadro P6000 (:drooling)). But hobbyists/poor engineers like me do not have access to those professional grade GPUs. Instead, we need to get away with low-end GeForce graphic cards. Nothing wrong with those though. They plan amazing games. But there are some problems when running ML algorithms like mnist_deep (a DNN based sample application) that allocates huge amount of memory in one go. The problem executing this on GPU with less than 4GB of GDDR5 is that the application simply causes an Out Of Memory (OOM) exception.

Though there is a way to use batch-size (i.e. allocate memory in small chunks). The Tensorflow team talks about it in the documentation but does not have a proper example that we can follow. So after some search and find operations, I was able to get hold of the code. Below is the modified mnist_deep.py that runs on all GPUs irrespective of the memory they have. One can further reduce the batch-size if the problem continues.

Line #166 and #167 were the original lines which were trying to create the dictionary with the whole set of data in memory causing OOMs. Line #168 to Line #179 is the replacement code that divides the data into batch-sizes of 50. Nothing strange there, we are simply taking smaller number of images and calculating the accuracy. Hope it is easier for you to get the solution and don’t have to run around like me. ENJOY!

Automate Your Twitter with a BOT!

We all have Twitter accounts and we all tweet stuff. But sometimes, we all suffer from information overload. And we all need to get more followers right? So one of the things we can do is automate Twitter posts using a tweet bot. I am using nodejs as my framework (simply because it works for webapps pretty good). You can search on the web to understand how to install nodejs and npm. Use the latest version and it should work fine. I am also using a Twitter API client for nodejs known as Twit. Twit is a very simple library that wraps all the twitter APIs in easy to use function calls. The code is pretty straight forward as can be seen below.

But first, go to https://dev.twitter.com/ and register your app. You will now get a consumer key and a consumer secret. Authenticate the app to use your twitter account which will give you additional access token and access token secret. Create an environment file and store these in there. If you know javascript, the code is very easy to follow. We first create a Twit client, give it the secret keys that will allow it to authenticate our account and use the secrets to post messages on our behalf. Go through the API docs for Twit, they are very extensive.

But if you are just plain lasy, copy the code I have written, modify the environment variables and get going. You can add more code as needed. Be sure to share it though. Now, either you can deploy it locally on your machine or use a cloud hosting service supporting nodejs hosting. My provider does not support nodejs hosting and I am in no mood to change them (YET) and I don’t want it hosted locally since I am not the guy who keeps my app running all the time (though seems a good idea now) and I am not the one to spend bucks on another hosting provider. So I have 3 options.

1. https://glitch.com/
2. https://www.heroku.com/
3. https://www.openshift.com/

Of course, there are more but you can use either of these to host your app for free. The only limitation is that your app will be killed if not accessed within 30 minutes. So you simply need to login to your computer and keep pinging the hosted URL :D. Naah.. I am kidding. We can start a cron job and use many of the free cron jobbing sites like:

1. https://cron-job.org/en/
2. https://uptimerobot.com/

For my twitter bot, I am using heroku and cron-job.org. Between, have a look at my bot at https://twitter.com/perfmetrics_bot. And besides retweeting, you can also use the bot to greet your new followers, say good by to people who unfollow you, gather some statistics, etc. I will write a different article on that one (once I update my bot). Between, be sure to follow my proper Twitter Account https://twitter.com/wolverine2k and show your support.

ENJOY!

Simulate 100s of clients in Meteor

Meteor is a subscribe publish based application development framework which allows for rapid application development using the same code base. I had the chance of working on one of the most demanding meteor applications ever written. The client is a high profile company working with automation. So basically one of the problems they faced was to simulate tens of thousands of devices in a virtual environment. One of the most logical ways to go would be to dockerize the client and then use docker swarm mode to auto scale the clients. But the code base right now is a monolith and hence dividing the different functionality into micro-services is doable but will take a long time. The client wanted this done like the day before I got my hands dirty.

So even though the long term plan is to use docker swarm, I had to do something amazingly fast and simple that works with the current structure (without too much modifications to existing code base). So the next best thing that could be done was to use bash :). Below is a script I wrote that can be re-used across multiple workstations and run multiple clients to simulate load scenarios for the server. The server of course is on a separate machine than the ones running the clients. Each simulated client will have its own log window. The best part is that memory usage on the workstations does not explode exponentially. So one can only open a single browser window and interact with the client directly.

Of course the script does not have very many checks so extend on it as needed. This works with any meteor applications directly. The bash script is as below.

Now all you need is a special csv file that needs to be given as input to the script for it to launch multiple clients. The csv in this particular case is as below.

# Lines starting with a # are ignored & treated as comments
# Please do not insert any empty lines
# Format for this file is as below
#
# port,macAddress,room_id,room_name,eh_ipaddr_port,workingDir,mongoDB

3000,32:9D:8B:A2:BF:23,undefined,room1,62.20.14.169:3002,/tmp/lisoSim,mongodb://127.0.0.1:3001/meteor
10000,32:9D:8C:A2:BF:23,undefined,room2,62.20.14.169:3002,/tmp/lisoSim,mongodb://127.0.0.1:3001/meteor1
10001,32:9D:8C:A2:BE:23,undefined,room3,62.20.14.169:3002,/tmp/lisoSim,mongodb://127.0.0.1:3001/meteor2
10002,32:9D:8C:A4:BE:23,undefined,room4,62.20.14.169:3002,/tmp/lisoSim,mongodb://127.0.0.1:3001/meteor3
10003,32:9F:8C:A4:BE:23,undefined,room4,62.20.14.169:3002,/tmp/lisoSim,mongodb://127.0.0.1:3001/meteor4

This is pretty much it. One thing to remember is that the script uses the same mongodb for multiple client instances with different database. Put your comments and tell me improvements needed. ENJOY!

Machine Learning – Baby Steps

Machine learning (ML) is the “FUTURE”. I have been reading about it for quite some time now and I am pretty convinced by the statement. We are all talking about BigData, predictive analytics, etc. but really, when a system dude like me tries to foray into the field of ML, everything seems so overwhelming. The discussion starts with having millions of records (if you are lucky). Otherwise, it is 4TB of unstructured data as a start. Your systems brain tries to grasp the big picture and gets lost in trying to figure out the details. But well, after reading around, grappling, experimenting and reading a bit more, I think that learning ML is doable for us system dudes. You do not have to be a math genius (well, it helps if you are). But I will start with this blog of mine documenting the baby steps needed. I will use it as my reference and you can use it as yours if you find it useful.

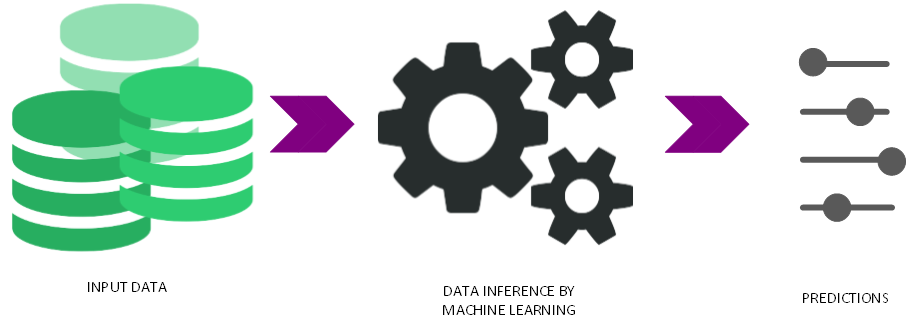
In general, before we dive into the ‘code’, we need to understand how ML works. It is actually very simple from a 10000 feet view.

We have a blob of input data, we run it through some gears and out comes the prediction :D. But seriously, we have many different data streams with either structured or unstructured data, we create usable data i.e. refine the blob to only use data which we think is usable for our predictions and remove the unnecessary noise. Beware that these steps are iterative. So you keep going back to the same step again and again until you find something the most optimal model. The most optimal model definition is based on the measurement criteria setup before you try to solve whatever problem you are trying to solve using ML. The refined data is then fed into a model and the model output is measured against sample data. Of course, you now have supervised and unsupervised learning and associated algorithms and models. But 90% of ML is supervised learning i.e. the refined data has the answers your model is trying to predict. You make the model learn from part of the sample refined data and then execute the model on the rest of the data to understand if the model predictions were as expected. You simply rinse and repeat the process as many times as it takes. There are many frameworks (FW) and tools that we can use for ML as listed on KNuggets. But we will use something very simple to start with that helps us understand ML.

We will use Google’s TensorFlow (TF). I bet you have heard about it and it is probably the one that made you more interested in ML (at least that was for me). There are quite some sites which show how TF is superior to other FWs & tools so I won’t go into that. Okay now, after those basics, let’s start with our first baby step. We need to install/get tensor flow (TF) on our system for using it. But being the nice Docker enthusiast that we are, we will use it. I work primarily on Linux but AFAIK, Docker also works on Windows :). Download & run your local copy of TF using Docker by typing in the below:

docker run -it -p 8888:8888 tensorflow/tensorflow

Once everything is running, the terminal will show a link (with a token) which you can open in your browser. The first page just shows some list of sample files and stuff. And you don’t really know how to navigate around. No worries, we still do a hello world in tensor flow (and we are using python to do it). Click on new Python 2 (notebook). And a cell would be shown. I will try to add some screenshots later but it is pretty simple. Just follow the instructions ;). Now for the fun part, paste in the following (or type it in if you prefer) into the text box beside the In[]. The code is self-explanatory so I won’t bother.

# Import tensorflow
import tensorflow as tf

# Open up a tf session
sess = tf.Session();

# Print our hello World!
hello = tf.constant("Hello World from TensorFlow!");
print(sess.run(hello));

Now click on Cell & Run Cells in the page menu. You should be able to see the Hello World text. Yippee, this is your first baby step in TF. You can also do additions and all the normal python stuff that you can do. Just use the tf.constant() & sess.run(). Do some more experiements and be comfortable.

Next we will start doing something really cool. Make sure you save your notebook. ENJOY!